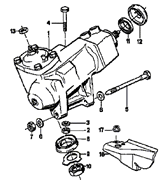
- 17 inch wrench
- Flat screw driver or hex wrench
Turn your steering wheel all the way to the right or the
left, unscrew the nut # 13 and turn the screw 1/4 of a turn.
Turn your steering wheel to normal position and check to see
if the play is still there. Readjust if necessary.
1. Jack up the front of the car and with the wheels hanging
and the motor off..steering column unlocked...turn the wheel
to get a sense of mechanical friction.
2. Take a flat file..and with any sharp edge on the file..score
a mark on the top/end of the steering box adjustment allen
screw so you can keep track of clocking....very easy to get
lost without a mark after you loosen the 17mm collar locking
nut.
3. I would start in about 10 degree increments..tightening
the top screw..then repeat step 1. You will be able to tell
if you overtightened the adjustment screw by how much tension
you feel in the steering with the motor off..just turn the
wheel back and forth.
- Best tip I can provide is to adjust the screw with the steering
wheel well “off center.” Why?..because the steering
box sector gear inside is eccentric which deliberately introduces
a higher contact ratio on center for better engagement/less
wear/better on-center feel.
4. You should only feel “just a bit more friction”
as you traverse through center with your steering box...if
you feel the steering get hard..box is set too tight.
If the play can not be removed by adjusting the screw or if
your steering box is leaking, you will need to change it.
Try to find one in a junk yard from a car with low mileage.
IF YOU HAVE A V8 (530i - 540i)
Procedure from Michael Evans
Well, look where the steering box is located, as you can see,
there is no room up top to adjust it.
Be sure to disconnect the battery
prior to touch anything.
1. Pull up rear seat bottom and disconnect battery anode.
2. Jack up front of car and put on jackstands.
3. Remove both front splash pan and rear splash pan
4. Remove 4 nuts on top of plastic engine shroud and remove
shroud.
5. Remove 4, 10mm bolts that hold metal heat shield under
steering gearbox and slide out by tire(one bolt is thru an
access hole, use extension)
6. Remove the two nuts (17mm and 13mm) under gusset that hold
the front engine (rubber donut) mounts to frame.
7. Place piece of wood(10"x2"x8") under oil
pan and place (3 ton) floor jack under wood. Gently jack-up
engine until the lower engine bolts just clear their holes
by 1/2".
8. Using 13mm socket(on 1/4" drive) remove nut on rear
of steering box that holds heat shield and a a/c spacer. Remove
same bolt on top of box. Now slide out the heat shield to
the rear and remove.
9. Douse the adjusting nut on top of steering box with WD40
10. Using 17mm socket, 3/8 short extension, 3/8 long extension
and two 3/8 univ joints, snake down from top of engine comp't
and with tbar break the adjusting nut loose.
11. Turn steering wheel 1 turn CW. Make sure nut is loose
and using 4.5mm allen key turn CW til nut is tight then back
off a few hairs and snug-up nut. Turn wheel throughout range.
You want no slop and no tightness. If too tight back-off.
When feels good.
12. Tighten nut. I used a 1/4"rachet with 3/8 adapter
to 17mm socket.
13. Retest steering should be silky smooth - no slop.
14. If OK Replace top heat shield and bottom heat shield.
15. slowly lower middle jack making sure mounts(bolts) go
into holes. Then replace mounting nuts
16. Replace both splash pans and re-connect battery,install
seat bottom
|
